As we known, cloud miniSIPServer users can create IVR-XML files and audio files to build special communication services for their own companies. But these files had to be sent to our support team to upload to their virtual servers for them.
It is very cumbersome and inconvenient.
Now we upgrade cloud system to permit users to upload IVR-XML and audio files by themselves. Please click menu “Profile – IVR-XML file or System audio file” to do that.
FXS gateways can help to connect traditional phones to VoIP deamon. The common topology is below.
VoIP deamon <--> miniSIPServer <--> FXS gateway <--> traditional phone
In normal, one FXS gateway connects to one traditional phone, but some FXS gateways can connect to several phones at the same time. We need to pay attention to this scenario.
The FXS gateway need to bind several SIP users accounts since it can connect to several phones. In another way, the gateway uses one URI address (including IP address and port together) to register these SIP accounts to miniSIPServer. That meas several SIP users will connect to miniSIPServer with the same address.
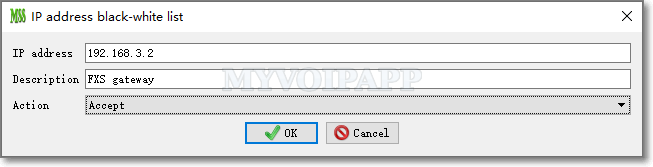
If one of the users is configured with wrong information, and the gateway keeps sending SIP messages to miniSIPServer, it will trigger ‘fail to ban’ feature, then the gateway’s address will be blocked by miniSIPServer. As we said, since the gateway uses one address to register several SIP users to miniSIPServer, other SIP users will have to be blocked together.
In this scenario, we need to stop ‘fail to ban’ for the gateway. We can add the address of the gateway into white list. Please click menu ‘services – IP address black-white list’ to add a record to accept the IP address. For example:
By default SIP network always uses SIP URI to carry information, such as From, To, and so on. For example:
sip:+8613901088888@ims.bj.chinamobile.com
But for traditional telecommunication networks, they always use E.164 telephone numbers which are different with SIP URI. So ETSI (or 3GPP) defines a new URI, that is TEL URL. For example:
tel:+8613901088888
So when working with IMS networks, there could have two URI formats, SIP URI and TEL URI. miniSIPServer can support both formats, it can process TEL URI of incoming calls automatically, but all outgoing calls always use SIP URI formats.
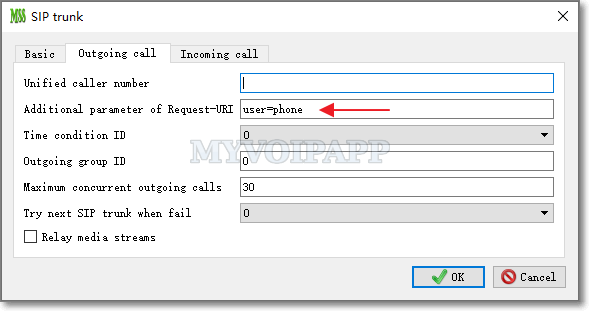
It could be a problem. Fortunately IMS networks consider it very carefully. For example, China Mobile can accept TEL URI and SIP URI with special parameter ‘user=phone‘ which is described below.
If we configure external lines of miniSIPServer to work with China Mobile networks, it can be no problem because miniSIPServer will automatically add ‘user=phone’ to Request-URI. But in some markets, China Mobile requires to establish SIP trunk connections, then it could be a problem. miniSIPServer will not add ‘user=phone’ in Request-URI since we think it is a ‘server to server’ scenario.
To fix that, we add a ‘additional parameter of Request-URI’ parameter in SIP trunk outgoing call configuration. Please refer to the figure below.
As we know, miniSIPServer can run on Linux systems. Sometimes customers ask us about SIP clients which can run on Linux systems at the same time. In fact, there are lots of choices, such as linphone, jami, and so on.
Recently there is a new SIP client released. Most important, it is a core application in Gnome project. It is “Calls”. In Debian library, its definition is “Make and receive PSTN phone calls”. In fact, the latest version can support SIP protocol. In the Gnome project, we can see the description is changed to “Make phone and SIP calls”.
It is quite easy to install “Calls”. Just input following command:
sudo apt install gnome-calls
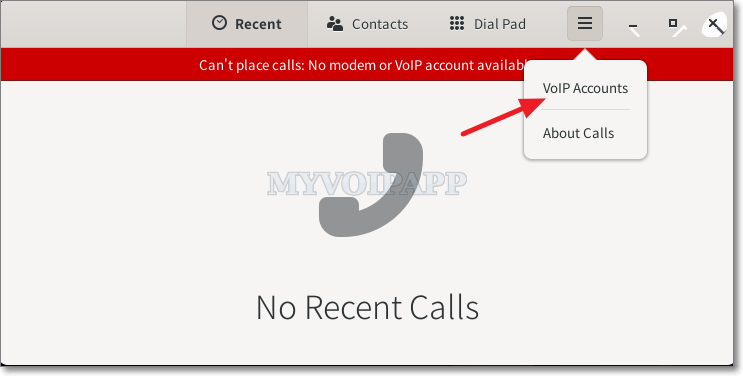
Please refer to the figure below for more details about its main window.
Gnome calls main window
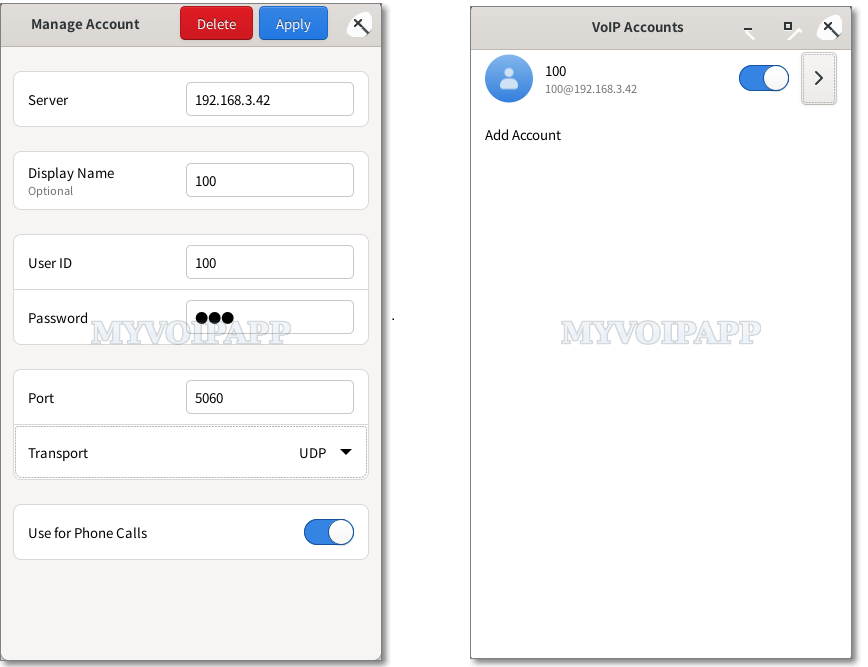
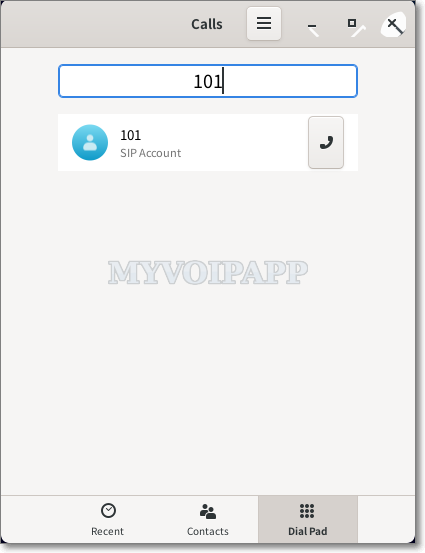
Click menu “VoIP Accounts” to add a new SIP account. Most items are same with other SIP clients. For example, miniSIPServer is at “192.168.3.42” and the account is “100”. Please refer to the figure below.
Configure an account
Please pay attention that (1) the default port is 0, we need to change it to 5060; (2) we need to enable the account. Calls doesn’t display its status, so we can check miniSIPServer local users’ window to check their status.
When making outgoing calls, we can dial the target number in the “Dial Pad” panel directly.
Make a call out
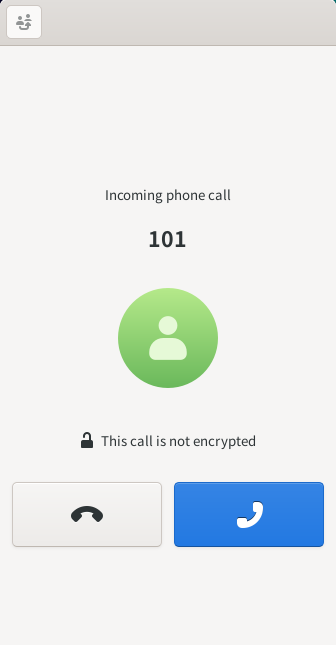
If there is an incoming call, just answer or reject the call.
Incoming call
Obviously “Gnome Calls” is very simple at this time and it will be developed with more functions. If we are deploying a simple VoIP network and hope to build all elements on Linux, it could be a good choice.
We often configure miniSIPServer to connect VoIP carriers’ network with external lines. There are lots of VoIP carriers and someone always asks us how to configure external line.
In our step by step document, we give a demo to configure MSS to work with “call centric”. You can refer to this document for more details about VoIP networks and external lines. In another way, we give some more examples in chapter “External lines” of F.A.Q document. Please refer to these documents if you are interesting in it and hope they can be helpful to you.
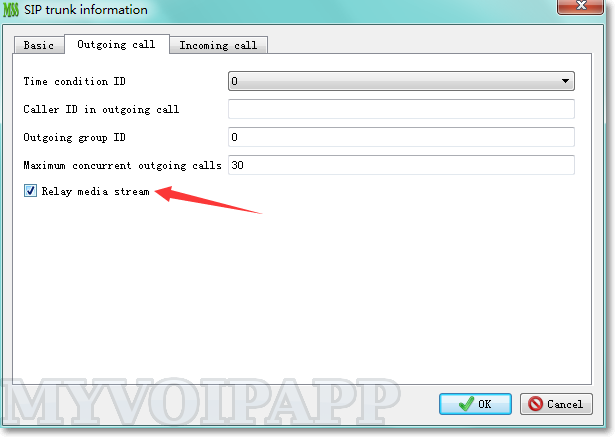
In some VoIP scenarios, we need configure “SIP trunk” to work with VoIP providers or gateways. When processing media streams, we hope (1) local users/phones should process their streams by themselves without MSS, and (2) MSS should help to relay media stream for all outgoing calls to peer SIP servers or gateways.
To fit these requirements, we update MSS V32 to be able to configure “relay media” item in “SIP trunk”. Please refer to following figure for more details.
Configure “relay media stream” item in SIP trunk outgoing call
By the way, MSS can only relay audio streams at this time, so video streams will be lost if you want to MSS to relay streams.
miniSIPServer can support customers’ own audio files to replace default files. With previous MSS, customers have to backup and restore these files once they want to upgrade MSS.
This is a little trouble. With the new V32, we can resolve it now.
When MSS starts up, it will create a sub directory ‘cust_ann’ in ‘mss_ann’ directory, now all your own audio files can be stored in this directory. When MSS is uninstalled or upgraded, this directory and its files will not be deleted or replaced by default files, and MSS can get audio files from this directory directly when it starts up.
In windows system, it could be “d:/myvoipapp/minisipserver/mss_ann/cust_ann” directory by default. In Linux system, it could be “/opt/sipserver/mss_ann/cust_ann/”.
Please refer to our online document for more details about how to record own audio files.
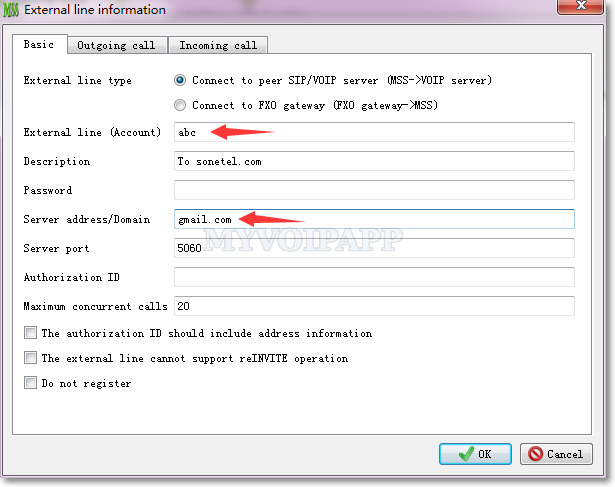
“sonetel.com” is a VoIP carrier who can provide local phone numbers. We can add “external line” to work with their servers. According to its description, there are some special items need to be cared:
Sonetel uses email address as SIP account and
It deploys SBC or proxy to process all incoming SIP messages.
Here we give a simplel example to describe how to work with Sonetel. We assume the SIP account is “abc@gmail.com”.
In MSS, please cilck menu “data > external line” to add a record.
Configure Sonetel lline
In “Basic” tab, the line type should be “Connect to peer VoIP server”, the Account should be “abc” and the Domain is “gmail.com”.
By the way, the Password is the password you sign up in Sonetel, not your own email password.
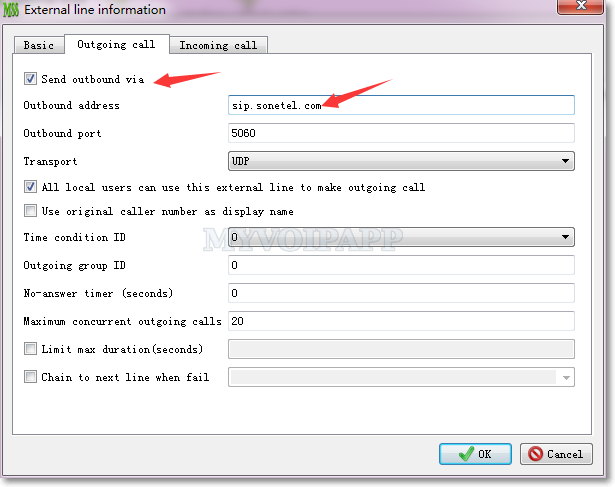
Since all SIP messages are processed by sonetel SBC/Proxy, we need configure “outbound” information in the “Outgoing call” tab. Please refer to following figure.
Sonetel SBC
The Sonetel proxy address is “sip.sonetel.com” which should be described in the email sent by sonetel.
Yesterday, we helped a Chinese customer to deploy MSS to work with CTC IMS network. In this scenario, CTC IMS network has ZTE soft-switch (according to User-Agent header in SIP messages) , we need be careful to cooperate with it.
Since CTC provides user name and password for authorization, we configure “external line” in MSS to do that. Following sections will illustrate some key points.
Authorization user name
By default, we often use “External line (account)” as authorization user name, but ZTE softswitch requires full URI format, so we need configure “The authorization ID should include address information” in external line. Please refer to following figure for more details.
Authorization user name
For example, if this item is selected, the authorization name will be “+8612345678@gd.ctcims.cn” according to above figure.
If it is not full format, IMS network will return “403 Forbidden” messages to reject it. In fact, we think it is a bug in ZTE softswitch since there is “realm” and “domain” parameters in SIP authorization header. No matter the user name is full format or not, the device should pass it according to successful authorization itself.
Anyway, if you have same problem to cooperate with other IMS networks, please pay attention to it and configure such item to take a try.
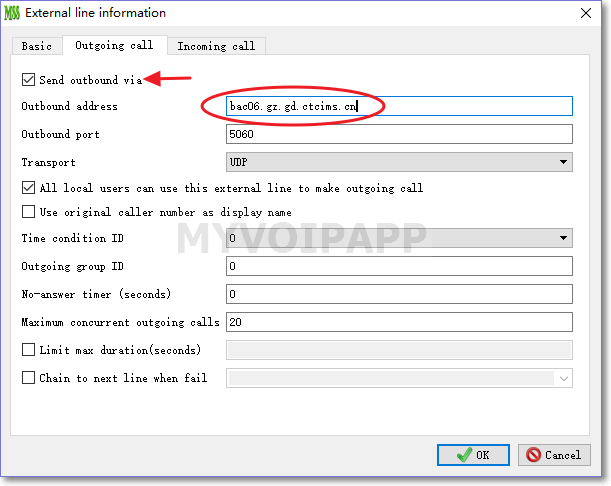
Proxy
In Chinese CTC-IMS network, its “SIP server” is logic domain, not a real SIP device and cannot be visited. In above scenario, “gd.ctcims.cn” is its domain, not its real address. SIP messages should be routed to another device (we think it is a SBC or proxy), so we need configure “Via” address in MSS external line configuration. Please refer to following figure.