One of our customers reported a problem that his external line was always offline with a voip provider. That’s very strange because “external line” is a very basic function of MSS and it works perfectly with lots of voip providers.
We captured the log and found the voip provider returned “400 Bad Request” message with following cause:
P-Registrar-Error: Invalid CSeq number
We checked the REGISTER messages, and think it is no problem in CSeq header. Following items are from MSS:
We checked RFC3261 to find “CSeq” in SIP-REGISTER procedures:
A UA MUST increment the CSeq value by one for each REGISTER request with the same Call-ID.
Obviously we are right. But why did peer side reject MSS’ messages?
Finally, we tried to send SIP-REGISTER with different ‘call-id’, and the problem was resolved! That made us confused again because in RFC3261 we can find the details of “call-id” in SIP-REGISTER procedures:
All registrations from a UAC SHOULD use the same Call-ID header field value for registrations sent to a particular registrar.
We think the voip provider is unprofessional. Unfortunally, it is hard for them to upgrade their system. So we have to add a switch varant to control MSS to fit this kind of situation.
[sip]
gVarSipRegSameDialog=0
If you have the same problem with some voip providers, please add above parameter into “mss_var_param.ini” file and restart your MSS to enable it.
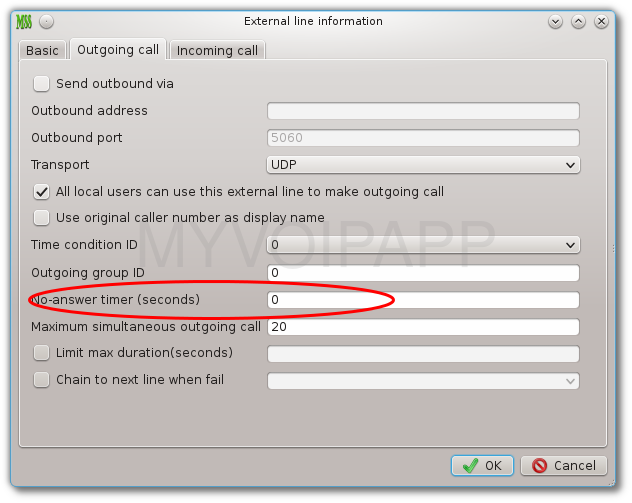
In the external line “outgoing calls” configuration, we add an item “no-answer timer”. This item is used to limit the no-answer timer value when make outgoing calls. Please refer to attached figure.
No-answer timer vaule in outgoing calls of external line.
By default, its value is zero that means the line will use system default no-answer timer value. If it is set a value, the line will use it firstly.
For example, if it is set to be “15”, then the line will force to release the call in 15 seconds if peer side doesn’t answer the call.
This feature was merged to the latest V25 (build 20160126).
Some special SIP devices, for example embeded devices in automaticated system, don’t have full SIP capabilities, they can make or receive simple SIP calls without account and password authorization. They even cannot send REGISTER messages to MSS to update their own status.
Yep, we can configure them as “SIP trunk” in MSS. but it will lost several key features, such as ringing-group. In some scenarios, customers hope to ring all such devices together, so we have to treat them as “local users”.
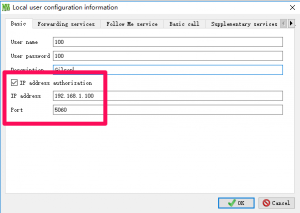
To fit these requirements, we add “IP address authorization” in local user’s configuration. That means MSS will not require SIP phones/devices to register them firstly, and will not check their account and password if their messages are from specific or configured IP addresses. Please refer to below figure for more details.
IP address authorization
By the way, we update openAPI document according to the latest V25. If you are interesting in it, please refer to openAPI document.
Some customers have several office branches and hope to establish VoIP connections between them. There are several methods to do that. Here we give an example to describe how to establish voip connections between two MSSes with SIP trunk feature.
2. Network topology
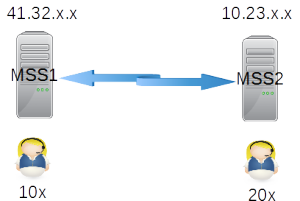
The network topology is simple. There are two office branches. Please refer to below figure.
Demo network
Before we setup voip network, it is better to assign extension numbers. Different office numbers will effect how to configure call routing in both MSSes. In above figure, we can see the extensions in office 1 are 1xx, and extension numbers in office 2 are 2xx.
Both MSSes are configured with public IP address. If your MSS is behind NAT or router and you want to provide connection for outsides users, please refer to another document firstly.
Now we give detail configurations for it.
3. Configuration
In below configurations, items should be kept their default values if we don’t configure them obviously.
3.1 MSS1
Please click menu “data – SIP trunk”, then add a record:
SIP trunk ID = 1
Description = to MSS2
Server address = 10.23.x.x
Please click menu “dial plan – analyzed called number” , then add a record for routing 2xx to such SIP trunk.
called number prefix = 2
route type = SIP trunk
SIP trunk ID = 1
3.2 MSS2
It is almost same with MSS1.
Please click menu “data – SIP trunk” to add a record.
SIP trunk ID = 1
Description = to MSS1
Server address = 41.32.x.x
Please click menu “dial plan – analyzed called number” for routing calls to above SIP trunk.
called number prefix = 1
route type = SIP trunk
SIP trunk ID = 1
csipsimple is a very good sip client software in Android, we often suggest our customers to use it if they want to deploy voip network with Android phones.
As we know, there are always one-way or no-way audio problem. To solve this problem, STUN should be configured in softphone. But some customers often response it is hard to set STUN in csipsimple.
In fact, it is easy to do that. Please follow below steps which are described in csipsimple website too:
(1) Go on setting Settings > Network – Tick “Use Stun” and fill a stun server on the field bellow. If you are cloud-mss subscriber, you can use your virtual server address as your STUN server too. Of course, you can use csipsimple default STUN server.
(2) You can also try to use ICE in addition to STUN if STUN alone doesn’t solve the problem : Settings > Network – Tick “Use ICE”.
V14.4 is updated to support a new feature in “dial plan” process. This feature is “refine called number”.
“Refine called number” can be used to refine called number before calls are routed to external lines or SIP trunks. It is the last chance to change called number to fit different requirements from peer VoIP servers.
For example, one of our customer has two VOIP accounts. One is from local provider, another is from international provider. These two VoIP providers have different number format requirements, and our customer only want to has one kind of dial plan for both of them. So we can configure “refine called number” to refine the final destination number to fit it. This scenario is illustrated below.
Scenario
As described above, there are two VoIP accounts, and users need dial “90xxxx” to make outbound calls. “9” is MSS default outgoing call prefix. “0” is required by local VoIP provider. At the same time, the international VoIP provider requires that the number format should be “0086xxxx”.
After compare these number formats, we can find that we only need change prefix “0” to “0086” for international VoIP account.
Step 1: configure an independent “outgoing group ID” for international VoIP account
Please click menu “Data / External line” and select the account to edit, then please click “Outgoing call” tab and configure following item:
Outgoing group ID = 1
Step 2: configure “number transition”
We need configure a new record to change preifx “0” to “0086”. Please click menu “Dial plan / Transition” to add a new record:
Transition ID = 1
Transition type = Replace
Start position = 0
Length = 1
Replace string = 0086
Step 3: refine called number for specific outgoing group
Please click menu “Dial plan / Refine called number” to add a new record:
Outgoing group ID = 1 <== defined in step 1
Called number prefix = 0
Transition ID = 1 <== defined in step 2
Here we maybe have a problem: the called number prefix is “0”, why? why not analyze “9” prefix? It is because that “9” has been deleted in “analyze called number” procedure and the number has been changed to “0xxxx” before it is sent to external line or SIP trunk, so we should analyze prefix “0” to refine final called number.
Two external lines, how to use specific one by dialing different called number prefix?
One of our customers has two different VoIP accounts, for example (1) 1234 and (2) 5678. It is required to select account “1234” if users dial “9xxxx” numbers and select account “5678” if users dial “8xxxx” numbers. The final numbers should delete these prefix “9” or “8” and “xxxx” should be sent to VoIP providers.
Solution
We can use MSS powerful “dial plan” features to fit this requirement.
By default, MSS uses called number prefix “9” to distinguish outgoing calls to outsides. If there are several external lines and without any special configuration, MSS will select one of them in round-robin for each call. Now what we need do is to configure different called number prefix and select different external line for them.
Step 1: configure number transition
In this step, we need configure a record to delete number prefix “8” or “9” from called numbers. Please click menu “Dial plan / Transition” to add a record illustrated below.
Transition ID = 1
Transition type = delete
Start position = 0
Length = 1
Step 2: add new “Analyze called number” records
According to requirement, we need indicate MSS to analyze called number prefix “8” and “9” to use different specific external line. Please click menu “Dial plan / Analyze called number” to add two records.
Record 1: analyze called number prefix “9”
Dial plan = default
Called number prefix = 9
Route type = external line
Specific external line = 1234 <== use specific external line
Change called number = yes
Transition ID = 1 <== configured in step 1
Re-analyze after transition = no
Record 2: analyze called number prefix “8”
Dial plan = default
Called number prefix = 8
Route type = external line
Specific external line = 5678 <== use specific external line
Change called number = yes
Transition ID = 1 <== configured in step 1
Re-analyze after transition = no
Trigger hunt-group for external lines incoming calls
Some customers use external lines to connect VoIP providers’ servers. So it is required to trigger hunt-group for all incoming calls from such external lines.
Lets’ assume the external line number/account is ‘123456’, so we just need trigger HG service according to this number.
Please click menu “services / multi-line hunting group / Detection configuration” to add a new record as following:
dial plan = default
called number = 123456 <-- this is the external line number
... ...
If the external line is configured with auto-attendant or routed to another destination number, what is the result? Don’t worry. HG detection has higher priority than these services, that means HG will be triggered even you configured AA or destination number in external line.
By default, MSS starts 5060 TCP port to receive or send SIP over TCP messages. 5060 is default TCP port defined by SIP standard. In MSS GUI or web UI, we can only change SIP UDP port.
If we want to change its TCP port, for example, we want to change it to 1234, we need do as following:
(1) In the MSS install directory, please create a text file whose name is ‘mss_var_param.ini’ file.
(2) In this INI file, please add following content: