More and more people start small business now, it is very important to keep communication with our customers. In normal, most of us just use a simple telephone system to do that. It can fit basic requirements. We want more, for exmaple, we want to establish a voice interaction for our customers, such as prompting "welcome to xxx company. Please dial the extension number or zero for assistance". We also want to build the communication system based on IP network. Can we do that?
Of course, we can do that! This document gives a step by step guide on how to establish a VOIP network for our business. The solution will be as simple as possible.
VOIP is "Voice over Internet Protocol". It is a general term for a family of transmission technologies for delivery of voice communications over IP networks such as the Internet or other packet-switched networks. VOIP can be a benefit for reducing communication and infrastructure costs.
In another way, it is very easy to use VOIP to establish our communication system with full features.
In normal, we need to setup three main components: IP-PBX, phones (or soft-phones) and VOIP carriers' service which you can use to call other people in PSTN network(Public Switched Telephone Network, it is our traditional telephone network).
2.1 IP-PBX
There are lots of IP-PBX. Some of them are hardware based devices, some of them are software based servers.
Of course, here we suggest miniSIPServer to you. miniSIPServer is a professional SIP PBX for Windows and Kubuntu/Linux systems. It has all features we need. Most important, it is so easy that we can setup and run it in several minutes!
2.2 Phones
We can buy SIP phones from Grandstream, Cisco, Linksys, etc. If we still want to use our traditional analog telephones, we can buy some SIP adapters from them.
We use some softphones. miniSIPPhone is suggested here.
2.3 VOIP carriers
Lots of VOIP carriers can provide SIP services. We suggest following VOIP providers:
Once you register to these VOIP providers, they will give you a SIP account information, such as SIP server address, account name and password, etc. These information will be used when we configure our IP-PBX.
Following figure describes a simple environment for small business or home based business.
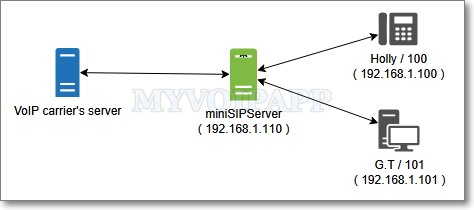
In our demo scenario, the small company only has two members, Holly and G.T.
Holly's extension number is 100, and G.T's extension phone number is 101. Both of them use SIP softphones. The IP address of Holly's PC is 192.168.1.100. The IP address of G.T's PC is 192.168.1.101. miniSIPServer will be installed on another PC whose IP address is 192.168.1.110.
The company establishs connection with PSTN through a VoIP carrier's network.
We will follow subsequent steps to establish the VoIP network.
Step 1: Setup miniSIPServer
Step 2: Connect local users to miniSIPServer
Step 3: Connect miniSIPServer to VOIP providers' network
Step 4: Deploy services
Configure some wonderful advance services for our small company, such as auto-attendant, ring group and pick-up, and so on.
4.1 setup miniSIPServer
This step could be the easiest one. We can download miniSIPServer SETUP file from https://www.myvoipapp.com/download.
There are several kinds of miniSIPServer, such as 5 clients, 20 clients, 100 clients etc. For example, "100 clients" version can support 100 extensions. Since there are only two members in our scenario, "5 clients" version is enough and it is a free version.
Before we install miniSIPServer, please make sure that PC and network are working well firstly.
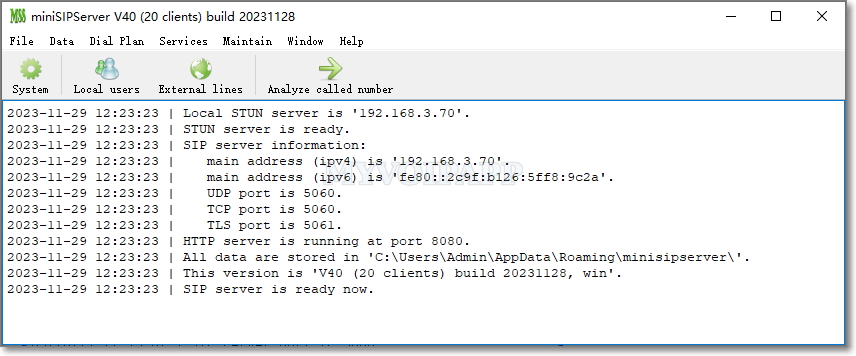
Then, please click .EXE file to setup miniSIPServer and run it. It is unnecessary to configure anything. So easy!
If everything is fine, miniSIPServer should run as following figure.
4.2 Connect local users to miniSIPServer
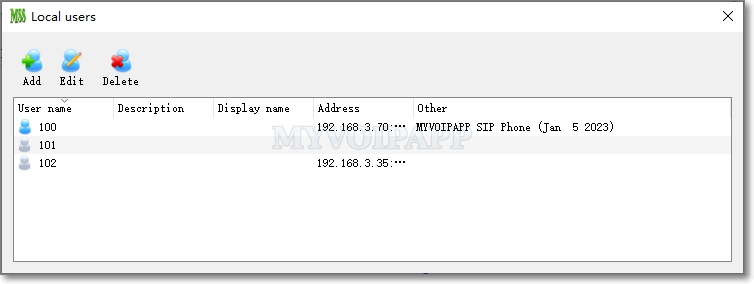
When miniSIPServer is installed, it will create three default extensions automatically. Please click button "local users" in main window to check them. The default passwords for these extensions are 100, 101 and 102.
We begin to configure Holly's softphone to connect to miniSIPServer. After install miniSipPhone, please click menu "File / SIP account".
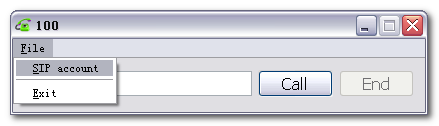
In the pop-up window, please configure SIP account like following figure.
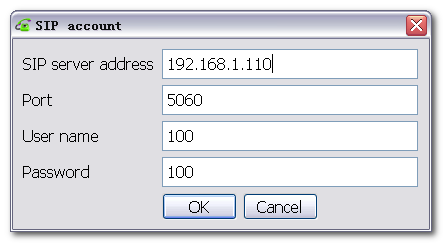
The key items are described below.
| Item | Value |
|---|---|
| SIP server address | 192.168.1.110 |
| User name | 100 |
| Password | 100 |
Please click 'OK' button to complete miniSipPhone configuration. It will try to register to miniSIPServer. If it successes, miniSIPPhone should display telephone number and be ready to make calls.

Now, Holly's extension has connected to miniSIPServer rightly. We can follow the same steps to configure G.T' extension. If you have other kinds of SIP clients/phones, they should be configured in the same way.
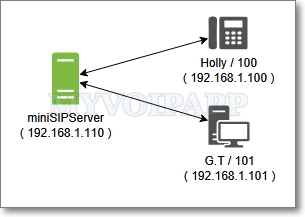
Both Holly and G.T' extensions have been connected to miniSIPServer. We can show miniSIPServer' local users window to check their status. Their icons should be blue.
After we finish this step, the basic VOIP network is established. Holly and G.T can call each other. Holly can dial '101' to call G.T, and G.T can also dial '100' to call Holly.
4.2.1 Add a new extension in miniSIPServer
In above configuration, we use default extensions '100' and '101'. In future, with the growth of company, more and more people will join with us, we need to add more extensions to support them. So we can do it as following:
In the 'local users information' window, please click 'Add' button to add a new extension.
In normal, we can just assign extension number and password to a new extension. The new employee can use this new account information to configure his/her SIP phone.
4.3 Connect miniSIPServer to VOIP provider
In normal, if we want to make call to outside or receive a call from outside, we need a VOIP gateway to connect our miniSIPServer and traditional telephone, or we need a VOIP provider to do it for us. We decide to connect our miniSIPServer to VOIP providers' network and we select CallCentric to be our VOIP provider.
After we request a SIP account and get a VoIP number from CallCentric, for example, the number is '17770001234', we will use this account to configure miniSIPServer to connect CallCentric.
In the miniSIPServer main window, please click button 'External lines' to add an external line information.
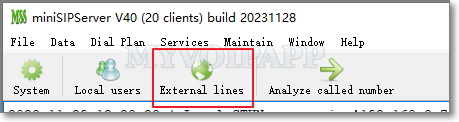
In the pop up window, please click button 'Add' to add an external line with CallCentric account information.
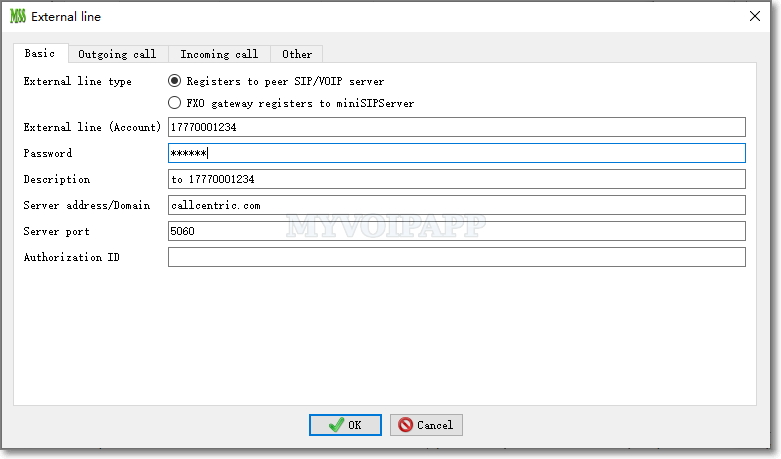
The key items are described in below table. Of course, you can update it according to your own configuration.
| Item | value |
|---|---|
| External line type | Register to peer SIP/VOIP server |
| External line (Account) | 17770001234 |
| Password | 1234 |
| Server address | callcentric.com |
| Server port | 5060 |
| Automatic attendant | Yes |
| All local users can use this external line to make outgoing calls | Yes |
Some VoIP providers require different authorization numbers with their accounts. In this scenario, we must configure "authorization ID" with such numbers. By default, authorization number is same with voip account, then it is unnecessary to configure "authorization ID" item or configure it as same as voip account.
Because we hope both Holly and G.T can make outgoing call, we select 'All local users can use this external line to make outgoing calls'.
Here we configure 'Automatic attendant' to support receiving incoming call from outside.
If the external line success to connect to peer server ( VOIP provider's network or VOIP gateway), the icon of the external line should be gray and without cross flag.
Then, we describe some details about making outgroup calls and receiving incoming calls.
4.3.1 Make outgoing call
As we have confirmed in above sections, Holly and G.T can call each other by dialing their extensions number directly. If we want to make outgroup call to our customers, how can we do it?
Since the external line is connected to VOIP provider's network ( or VOIP gateway), it is no problem to call outside customers, but we have to mention that we need add prefix '9' before we dial our customers numbers. In miniSIPServer, prefix '9' is the default outgroup prefix which is used to distinguish call type. For example, if the customer's number is '1234568', we need dial '91234568'.
4.3.2 Receive incoming call
When we configured external line, we has indicated 'automatic attendant'. So when customers calls in, miniSIPServer will prompt to enter extension number. For example, once customers calls "17770001234" (the external line number provided by VOIP provider and configured in miniSIPServer), they will hear "Welcome, please enter extension number" and customers can enter '100' to call Holly or enter '101' to call G.T.
In another way, the default announcement can be modified and replaced. We can change it according to our real requirement, for example, we can change it to "welcome to xxx company,...". Please refer to the "Automatic attendant" online document.
Because miniSIPServer uses "RFC2833" DTMF mode and SIP-INFO to collect the customer's input digits, we must confirm with VOIP providers that they can support these DTMF modes.
When we finish above configurations, we success to establish our basic VOIP system. Is it enough? Of course, no! We want more useful services to support our communication, such as Voice mail, ring group, etc.
Please visit our website for details of all services.