By default, most SIP devices use SIP over UDP as their main protocol, but for some other SIP devices or VoIP system, they require SIP over TLS, specially for some enterprise unified communication servers.
miniSIPServer V13.1 or above versions can support SIP over UDP/TCP/TLS. The network topology can be following type:

At this time, miniSIPServer can only support local users (SIP phones) with TLS. That means you can not configure "SIP server" or "External lines" with SIP over TLS.
By default, miniSIPServer uses TLSv1.2 and TLSv1.3 methods at this time. SSLv2, SSLv3, TLSv1 and TLSv1.1 have been discarded. Please make sure of your SIP phones can support TLSv1.2 or TLSv1.3.
You only need indicate miniSIPServer to load your own certificate file and private key file. Both these files must be PEM format. Certificate file must be renamed to 'server.crt' and private key file must be renamed to 'server.key'. They should be saved in the 'siptlsCert' subdirectory which can be found in AppData directory.
For example, if you are using Windows version and miniSIPServer AppData directory is 'C:\Users\your_name\AppData\Roaming\minisipserver' directory. Then you must save your certificate file to be 'C:\Users\your_name\AppData\Roaming\minisipserver\siptlsCert\server.crt', and priviate file should be saved to be 'C:\Users\your_name\AppData\Roaming\minisipserver\siptlsCert\server.key'.
If you are using Debian/Ubuntu system, miniSIPServer AppData directory is '/home/your_name/.minisipserver'. Then your certificate file should be saved to be '/home/your_name/.minisipserver/siptlsCert/server.crt' and private key file should be saved to be '/home/your_name/.minisipserver/siptlsCert/server.key'.
After that, please restart miniSIPServer. If everything is ok, miniSIPServer should prompt SIP-TLS port information in its main window.
Q1: Can I use another TCP port to start TLS?
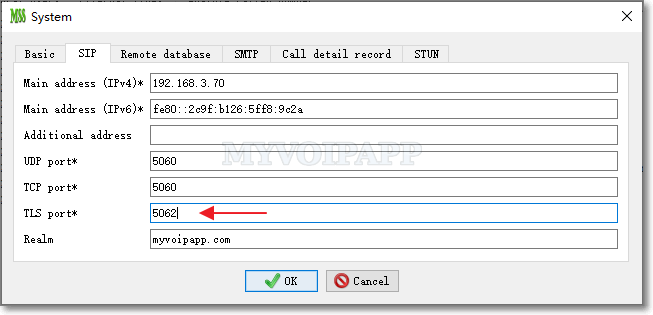
By default, miniSIPServer use standard TCP port 5061 to start TLS, but you are still able to change this port to any others you wish, for example 5062. In the miniSIPServer main window, please click menu "Data / System / SIP", then configure 'TLS port" item. After that, please remember to restart miniSIPServer to enable new port. Please refer to following figure.
Q2: Can I use my own self-signed certificate files?
Sure, you can. In fact, we also do that in our lab. We need mention that you need configure your miniSIPServer IP address or domain name as "common name" when you create your own self-signed files.
We usually use openSSL to create all necessary certificate files, please refer to following commands.
(1) openssl genrsa -out server.key 2048
(2) openssl req -new -key server.key -out server.csr
(3) openssl x509 -req -days 3650 -in server.csr -signkey server.key -out server.crt
Q3: Please suggest a SIP phone with SIP over TLS
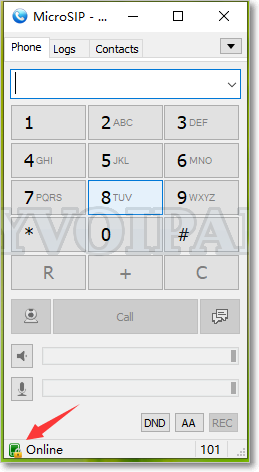
We strongly suggest MicroSIP. Please click here to visit its website to get more details.
It is quite easy to register MicroSIP to miniSIPServer with SIP over TLS. Here is a demo miniSIPServer in our lab.
server address: 192.168.3.16
TLS port: 5061
Local user name: 101
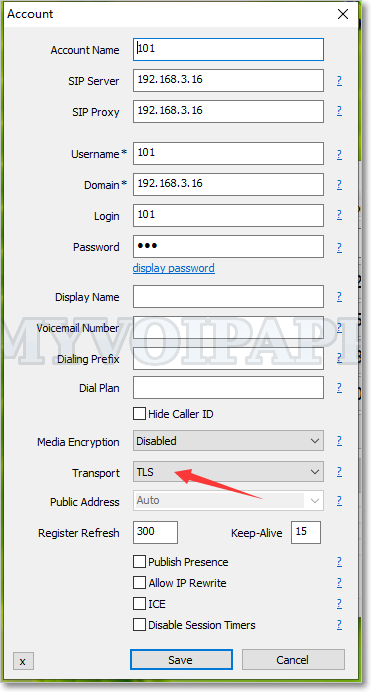
Please refer to following figure for the details of MicroSIP configuration.
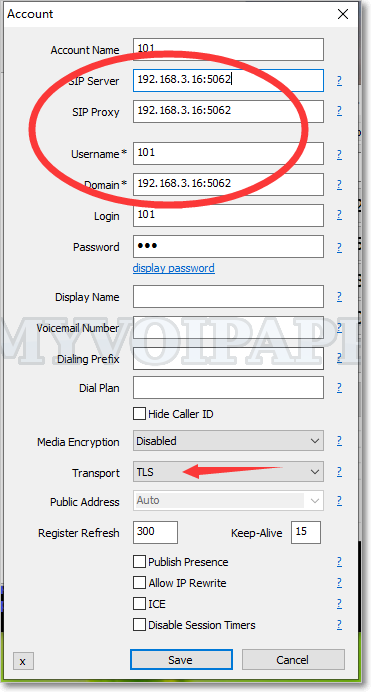
In "Q1", we have changed the TLS port to 5062 which is not the default TLS port, then we must indicate it very clearly in MicroSIP configuration. Please refer to following figure.
If MicroSIP registers to miniSIPServer successfully, its icon will have a special lock flag.