miniSIPServer is a SIP server for Windows and Linux systems.
Official website is https://www.myvoipapp.com or https://www.minisipserver.com.
Download URL is https://www.myvoipapp.com/download.
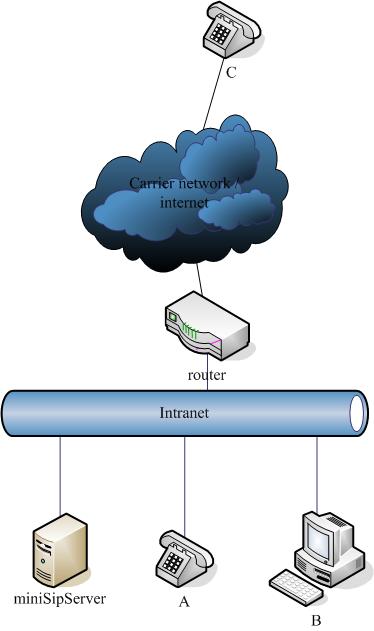
In above figure, there are some important network elements. Both A and C are SIP IP-Phone. B is a computer with a SIP client. A and B are in the same local network where miniSIPServer is installed. We name them as "local user". C is in another network and we name it as "external user". They are connected through internet.
In this network, we assume that C has registered to VoIP carrier network directly; A and B are local users(extensions) in local VoIP network. A is assigned an external line number. When a local user makes a call to external user, such as B calls C, we name this scenario as "out-group call".
Please refer to following table for details about this network:
| Actors | IP Address | Local number (Extension) | External line number |
|---|---|---|---|
| miniSIPServer | 192.168.1.100 | - | - |
| A | 192.168.1.101 | 101 | 2001 |
| B | 192.168.1.100 | 100 | - |
| C | - | - | 2002 |
miniSIPServer supports several different call scenarios. The dialing plan will be different in different scenarios. It is required that subscriber shall dial out-group prefix before the real number if he/she wants to call outside numbers. The default prefix is '9'.
Following table describes the dialing plan and its scenarios.
| Caller number | Called number (destination) | How to dial | Example |
|---|---|---|---|
| A | B | B's local number | 100 |
| A | C | Out-group prefix + C's external line number | 92002 |
| C | A | A's external line number | 2001 |
| C | B | - | It is supported through "auto attendant" feature. |
| B | A | A's local number | 101 |
| B | C | Out-group prefix + C's external line number | 92002 Note: the external line should be shared for other local users to make outgoing call. |
By default, miniSIPServer has pre-set three local users. Their names are '100', '101' and '102', and their passwords are '100', '101' and '102'. Of course, we can add, modify and delete local users dynamically and it is very easy to do that.
Please click menu 'Data / Local users' to show local users information windows.
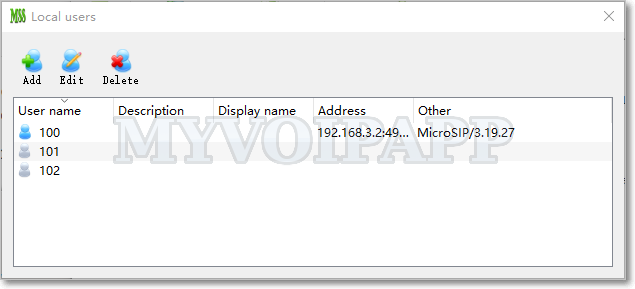
In this window, icons will be different for local users' different state.
| Icon | State |
|---|---|
 |
The user is off-line. |
 |
The user is online now. |
 |
The user is ringing. |
 |
The user is talking. |
4.1 Basic
| Item | Type or value | Description |
|---|---|---|
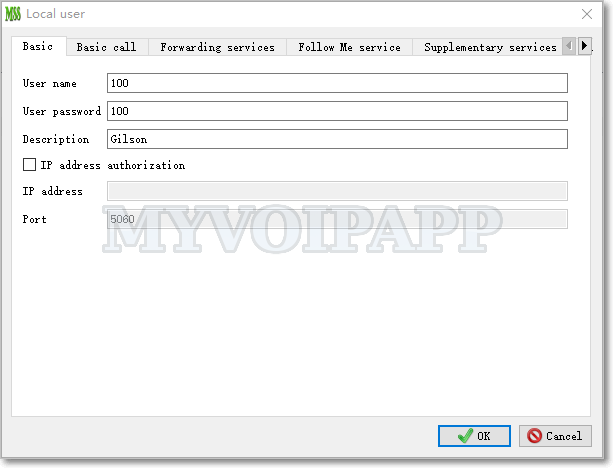
| User name | String | Local user's name |
| User password | String | User's password for SIP authorization. |
| Description | String | Description of current local user. For example, we can record where it will be deployed to. |
| IP address authorization | bool | Using IP address to check current local user authorization. If this item is checked, it is unnecessary for SIP phone to send REGISTER messages, miniSIPServer will check its address directly. By default, it is unchecked, miniSIPServer will always check local user name and password for authorization. |
| IP address | String | SIP phone's real IP address. |
| Port | Integer | SIP phone's real port. |
4.2 Basic call
| Item | Type or value | Description |
|---|---|---|
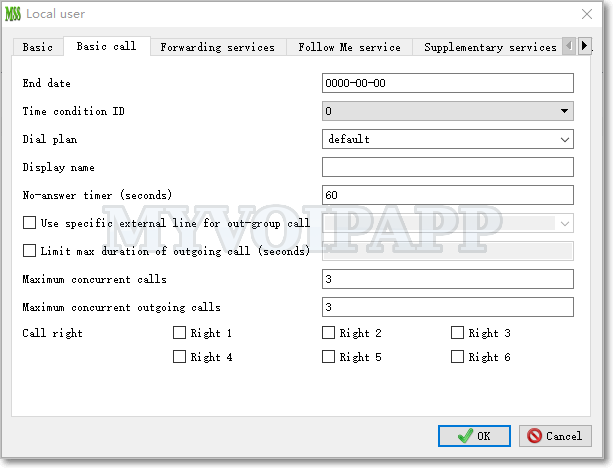
| End date | Date | End date of current local user. If it is expired, the local user will be invalid and cannot process any call. Its default value is 0 which means valid forever. Its format must be 'YYYY-MM-DD', such as '2012-12-10'. |
| Time condition ID | Integer | Please refer to "Time condition" service document for more details. |
| Dial plan | String | The dial plan name for current user. By default, its value is 'default'. In 'analyze called number' and routing selection process, miniSIPServer will use this item as a key index. If you configure it to different value, the final routing result could be different. |
| Display name | String | The caller name displayed to called party. For example, if the extension number is '100' and the 'display number' is 'Gilson', then called party will see 'Gilson' for its incoming calls; If this item is blank, the called party will see '100' for its incoming calls. |
| No-answer time | Integer | Indicate how long the call should be kept until the called party answers it. |
| Use specific external line for out-group call | Yes or no | If it is selected, a specific external line must be configured together. Then, this extension will use this specific external line to make out-group calls. |
| Limit max duration of outgoing call (seconds) | Integer | It limits the max duration of outgoing call and miniSIPServer will release the call automaticlly if it reachs the max duration. |
| Maximum concurrent calls | Integer | It limits how many calls this local user can process at the same time. If it is zero, that means this user cannot make outgoing calls and cannot receive any incoming calls. |
| Maximum concurrent outgoing calls | Integer | It limits how many calls this local user can make at the same time. If it is zero, that means this user cannot make outgoing calls. |
| Call right | Integer | Call right for different calls. In "dial plan / analyze called number" table, some called number prefixs can be configured with different call right, only the users who have specific call right can make such calls. |
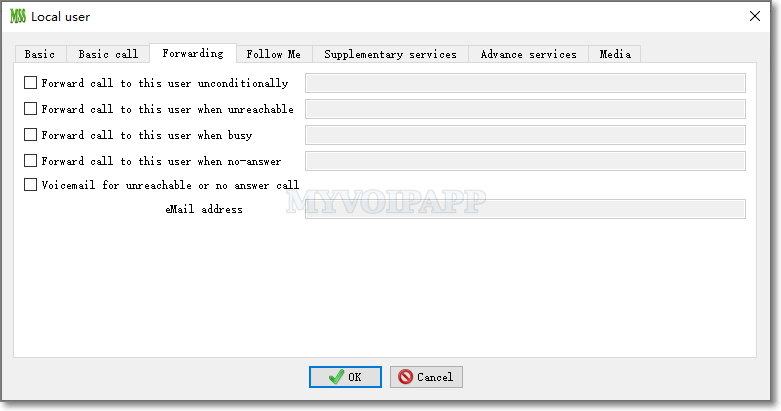
4.3 Forwarding services
| Item | Type or value | Description |
|---|---|---|
| Forward call to this user unconditionally | Yes or no | "Forwarding service" right for local user.
When it is selected, it means the user has this service right and a forwarding number can be configured together. Please refer to "call forwarding" service document for more details. |
| Forward call to this user when unreachable | Yes or no | |
| Forward call to this user when busy | Yes or no | |
| Forward call to this user when no-answer | Yes or no | |
| Voice mail for unreachable or no-answer call | Yes or no | If the user is absent or doesn't answer the call, miniSIPServer will prompt the caller party to leave a message and send this voice message to the user's email box. |
| eMail address | email address | Local user's email address. miniSIPServer will send voice messages to this email address. Please refer to "voice mail" service document for more details. |
4.4 Follow me / Find me
Please refer to "Follow me service document" for more details.
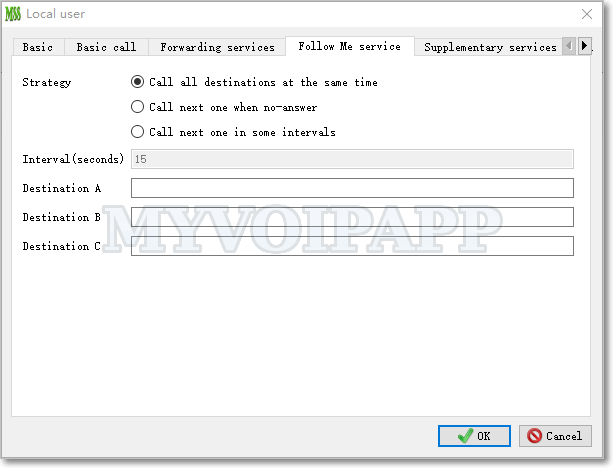
| Item | Type or value | Description |
|---|---|---|
| Strategy | 0,1,2 |
|
| Intervals | Integer | If the strategy is '2', this item must be configured. |
| Destination A | String | Destination A |
| Destination B | String | Destination B |
| Destination C | String | Destination C |
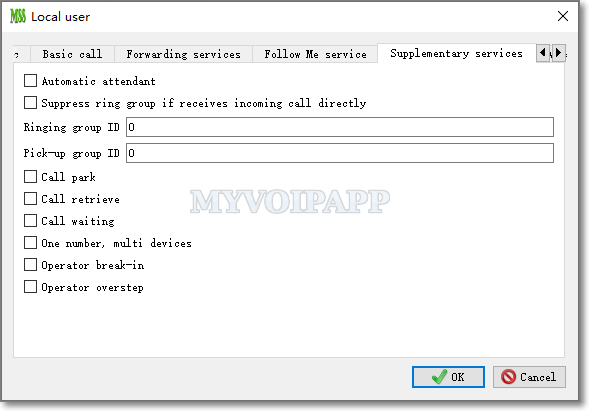
4.5 Supplementary services
| Item | Type or value | Description |
|---|---|---|
| Automatic attendant | Yes or no | Current user is an automatic attendant or not. Please refer to "auto-attendant service document" for details about this service. |
| Suppress ring group if receive incoming call directly | Yes or no | If this item is selected, this local user will ring and others in the same ring group will not ring together when caller party calls the user directly,. |
| Ringing group ID | Integer, >=0 | If it is zero, the user is not configured with ringing-group feature. Otherwise, all users with the same ringing group ID are in the same ringing group. Please refer to "ringing group" document for more details. |
| Pick-up group ID | Integer, >=0 | If it is zero, the user is not configured with pick-up feature. Othereise, all users with the same pick-up group ID are in the same pick-up group and can be picked up by the users in the same group. Please refer to "Pick-up and group pick-up" service document for more details. |
| Call park | Yes or no |
"Call park" service right indicator. Please refer to "Call park and call retrieve services" document for more details. |
| Call retrieve | Yes or no | "Call retrieve" service right indicator. Please refer to "Call park and call retrieve services" for more details. |
| Call waiting | Yes or no | "Call waiting" service right indicator. Please refer to "Call waiting service" for more details. |
| One number, multi-devices | Yes or no | "One number, multi-devices" service right indicator. Please refer to "One number, multi-devices" for more details. |
| Operator break-in | Yes or no | "Operator" service right indicator. Please refer to "operator service" for more details. |
| Operator overstep | Yes or no | "Operator" service right indicator. Please refer to "operator service" for more details. |
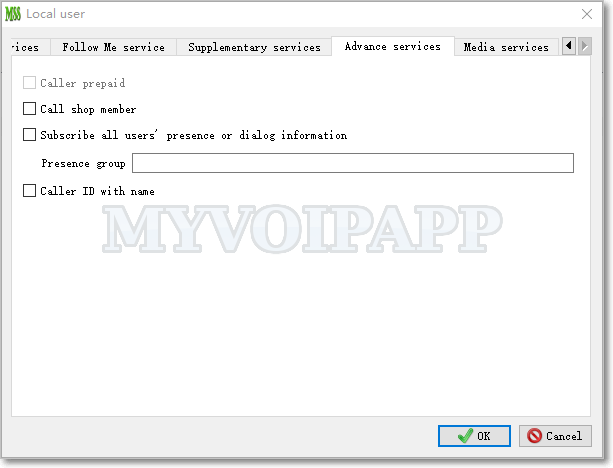
4.6 Advance services
| Item | Type or value | Description |
|---|---|---|
| Caller prepaid | Yes or no | It indicates whether current user is a prepaid user or not. If it is a "caller prepaid" user. miniSIPServer will reduce its balance when it makes out-going call.This item will be enabled only when you configure remote database in system configuration. Please refer to "Caller prepaid service document" for more details. |
| Call shop member | Yes or no | Current user is a call shop member or not. Please refer to "call shop service document" for more details. |
| Subscribe all users' presence or dialog information | Yes or no | Subscribe presence. If it is selected, miniSIPServer will report others users'status to this user. Please don't select this option for common users since there will have lots of SIP messages to be reported. |
| Presence information group | group id | If this parameter is indicated, only the presence messages in the same group can be retrieved. |
| Caller ID with name | Yes or no | "Caller ID with name" service right indicator. Please refer to "Caller-ID with name service" document for more details. |
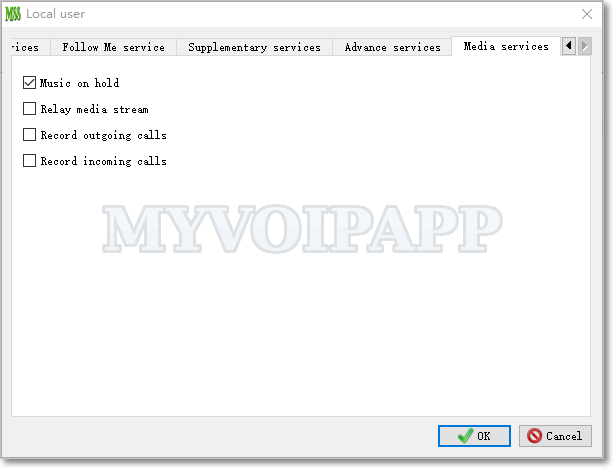
4.7 Media services
| Item | Type or value | Description |
|---|---|---|
| Music on Hold | Yes or no | When SIP clients send HOLD message, miniSIPServer should play music to peer sides or not. |
| Relay media stream | Yes or no | Used to indicate miniSIPServer to relay media streams for SIP clients. If the SIP client is behind NAT and it cannot STUN, it needs miniSIPServer to help to relay media stream. If the SIP client can travel NAT itself, it is unnecessary to ask miniSIPServer to relay media stream. |
| Record outgoing calls | Yes or no | Used to indicate miniSIPServer to record audio streams of this user's outgoing calls. Please refer to "Call recording" service document for details. |
| Record incoming calls | Yes or no | Used to indicate miniSIPServer to record audio streams of this user's incoming calls. Please refer to "Call recording" service document for details. |
In the example, local user A has an external line number which is provided by a carrier or VOIP provider, and then it can call outsider users out of local VOIP network.
Please click menu 'Data / External lines' to show 'external lines' main window for operations.
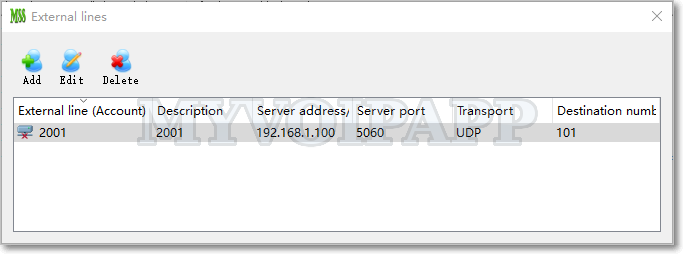
In this window, icons will be different according to state of external lines
| Icon | State |
|---|---|
 |
The external line hasn't registered into carrier network. |
 |
The external line has registered into carrier network. |
5.1 Basic
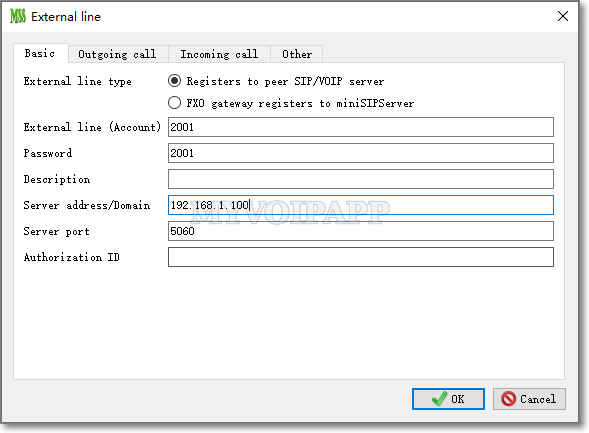
| Item | Type or value | Description |
|---|---|---|
|
External line type |
0 or 1 |
|
| External line (account) | String | The account name assigned by VOIP providers, or user name for FXO gateway. |
| Password | String | Used in authorization to VoIP providers, or for FXO gateway. This item can be blank, then it means unnecessary to authorize the account. |
| Server address / Domain | String | Peer SIP server. In normal, it is always the address of your VoIP carrier's server or FXO gateway. This field can be filled with IP address or host name. |
| Server port | Integer(>0) | Peer SIP server port opened by VOIP provider to receive or send SIP messages. |
| Authorization ID | String | It is for authorization. it can be blank or same with external line account. If it is blank, miniSIPServer will use external line account for authorization. Some VoIP providers will require different authorization ID with its account, then this item should be configured. |
5.2 Outgoing call
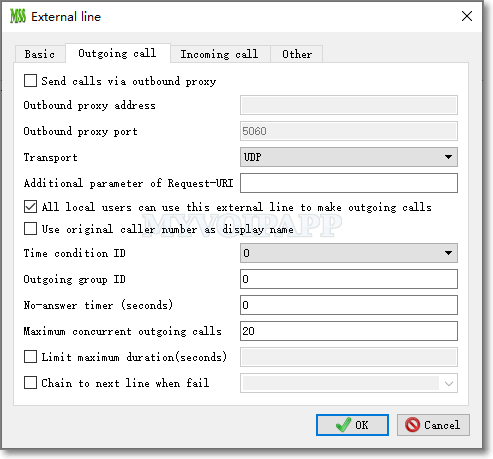
| Item | Type or value | Description |
|---|---|---|
| Send calls via outbound proxy | Yes or no | Some VOIP carriers require clients to send SIP messages to an outbound proxy server, then we need configure these outbound information to do that. |
| Outbound proxy address | String | IP address of proxy server. |
| Outbound proxy port | Integer | Port of proxy server. |
| Transport | UDP or TCP | SIP transport to transfer SIP messages. By default, it is always UDP. Some kinds of SIP devices require SIP over TCP, then we must select TCP transport to work with them. |
| Additional parameter of Request-URI | String | This item can be blank. If it is configured, miniSIPServer will append it to the Request URI when sending out messages to VoIP providers' servers (or gateways). It depends on the requirements of VoIP providers. |
| All local users can use this external line to make outgoing calls | Yes or no | If it is yes, other local users of miniSIPServer can make out-group calls through this external line. If it is no, only the user binded to this external line can make calls to VOIP provider. |
| Use original caller number as display name | Yes or no | When make outgroup calls through current external line, miniSIPServer can transfer original caller number to peer side as "display name". Then, called party will see "original caller number" instead of "external line number". |
| Time condition ID | >=0 | Time condition of current external line. If it is not work-time, the line will be out of work. Please refer to "time condition" feature for more details. |
| Outgoing group ID | >=0 | Define a group ID for current external line. Sevaral external lines or SIP trunks can be configured with same group ID which will be used in "dial plan" process to change numbers. |
| No-answer timer (seconds) | >=0 | When outgoing call is through current line, this value will limit the no-answer timer value. If it is expired, the call will be released and next line will be tried. The default value is zero that means use system default no-answer timer value. |
| Maximum concurrent outgoing call | >=0 | Limit how many concurrent outgoing calls can be processed. If it is zero, that means the external line cannot process any outgoing call. |
| Limit max duration (seconds) | >=0 | It limits the max duration of outgoing call process. miniSIPServer will release the call automatically if the max-duration timer is expired. |
| Chain to next line when fail | Yes or no |
If the call is fail, whether the call should be routed to next specific external line. If it is selected, the specific next line must be configured at the same time. |
5.3 Incoming call

| Item | Type or value | Description |
|---|---|---|
| Transfer incoming calls to |
|
If transfer incoming calls to auto-attendant. the auto-attendant service will be triggerred. If transfer incoming calls to a specific destination number, miniSIPServer will analyze this new number to get routing information. |
| Destination number | string | If transfer type is 'destination number', this item may be configured with a new destination number, and miniSIPServer will analyze the number to get new routing selection. In this scenario, if this item is blank, that means miniSIPServer will continue to analyze original called numbers of incoming calls to get routing information. |
| Record incoming calls | yes or no | It it is enabled, miniSIPServer will record incoming calls from this external line, and save their audio streams in local directory. |
5.5 Other
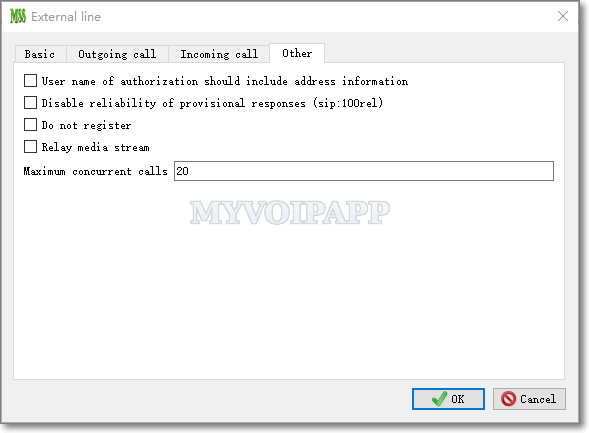
| Item | Type or value | Description |
|---|---|---|
| User name of authorization should include address information | yes or no | Some VoIP providers require that the user name of authorization MUST be 'user_name@domain' format, so enable this item will indicate miniSIPServer to use such format. Please pay attention that this item should be ignored if 'authorization ID' is configured in such format. |
| Disable reliability of provisional responses (sip:100rel) | yes or no | This is a special item. Some VoIP providers cannot support '100rel' capability and cannot rightly process INVITE messages with '100rel' indicator. So check this item to make miniSIPServer to remove '100rel' parameter from INVITE messages. |
| Do not register | yes or no | Some SIP trunk providers don't require REGISTER messages, then we can enable this item to work with them. |
| Relay media streams | yes or no | If this item is selected, miniSIPServer will have to relay media stream. |
| Maximum concurrent calls | Integer(>0) | The maximum concurrent calls current line is able to process. It includes incoming calls and outgoing calls together. |
These items will effect whole system. You can configure system in following ways:
1. Click 'System' button in main window toolbar.
2. Click menu 'data / System' to show and configure system information.
6.1 Basic
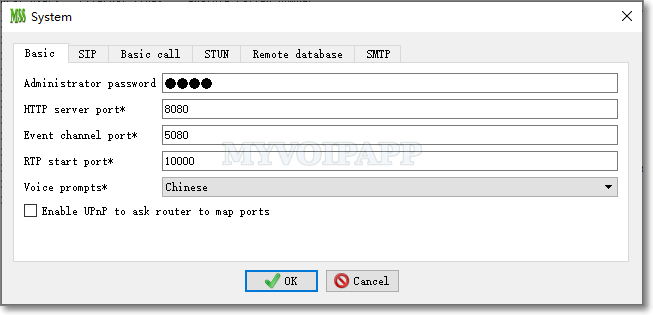
| Item | Description |
|---|---|
| Administrator password | Password of administrator. By default, it is blank. If we configure this item, we need input password to login into miniSIPServer GUI/Web system. |
| Out group call prefix | When a local user makes an out group call to his/her carrier network, he/she shall dial this prefix before the real number. In our demo network, such as A call C, the dialing plan is '92002'. '9' is default outgrou prefix and we can configure it to another character or just remove it. |
| RTP start port | The RTP start port in miniSIPServer. When miniSIPServer begin to play audio or collect digits, it will open port according to this configuration. |
| HTTP server port | use to start a inner HTTP/WWW server to provide web management. Please refer to "Web management" document for more details. |
| Event channel port | use to start a inner websocket port to report miniSIPServer inner status. Please refer to "Event channel" document for more details. |
| Voice prompts | use to indicate miniSIPServer which language audio should be played. In current stage, only english audios and Chinese audios can be provided. |
| Enable UPnP to ask router to map ports | If this item is selected, miniSIPServer will use UPnP protocol to ask router to map ports, including SIP-UDP port and some ports to relay audio streams. |
By the way, in this configuration we can see that some items have been marked with '*'' flag. It means miniSIPServer shall be restarted if you modify their values.
6.2 SIP
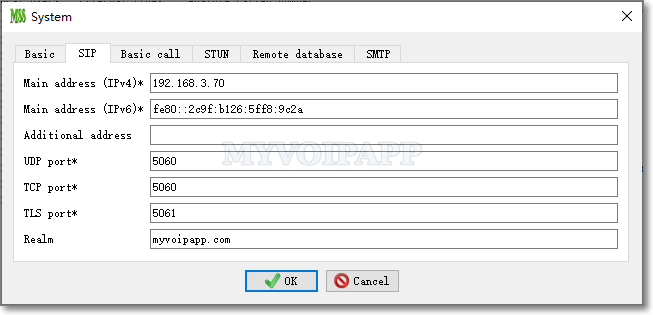
In default, miniSIPServer will get local IP address and default port automatically and open SIP socket according to these information. But in some environments, it is necessary to configure SIP address and port manually, such as (1) the computer which miniSIPServer is installed has two network adapters and administrator wants to select a specific one. (2) For some special reasons, 5060 port is not available for SIP application.
In this configuration, we can modify SIP common information to resolve above problems.
| Item | Type or value | Description |
|---|---|---|
| Main address (IPv4) | String | Indicate the IPv4 address or host/domain name which miniSIPServer shoud use to process SIP messages. By default, it is for IPv4 network. |
| Main address (IPv6) | String | Indicate the IPv6 address or host/domain name which miniSIPServer shoud use to process SIP messages. By default, it is for IPv6 network. |
| Additional address | String | Another address associated with SIP server, it should be able to be visited by devices or users. For example, it can be an address in private network. It can be a domain name or IP address too. |
| UDP port | Integer(>0) | Indicate the UDP port which miniSIPServer should bind to process SIP messages.
The default value is 5060 which is defined by SIP standard. |
| TCP port | Integer(>0) | Indicate the TCP port which miniSIPServer should bind to process SIP messages.
The default value is 5060 which is defined by SIP standard. Please refer to "SIP over TCP" document for more details. |
| TLS port | Integer(>0) | Indicate the TLS port which miniSIPServer should bind to process SIP messages.
The default value is 5061 which is defined by SIP standard. Please refer to "SIP over TLS" document for more details. |
| Realm | String | 'Realm' parameter in SIP standard, you can define it to be your own network address or name. |
6.3 Remote database
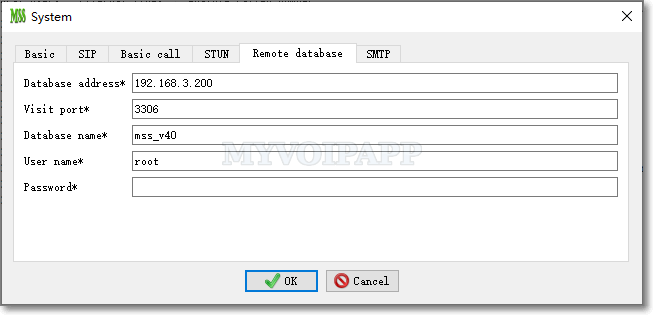
| Item | Type or value | Description |
|---|---|---|
| Database address | String | Remote MySQL address, it can be a IP address or host name. Note, miniSIPServer and MySQL can be installed in the same computer. In this case, the "database address" should be "127.0.0.1". |
| Visit port | Integer | Remote MySQL visit port. If you updated port in MySQL configuration, you need update this configuration in miniSIPServer too. The default value is 3306. Please refer to MySQL manual document. |
| Database name | String | Database name to be created in MySQL for miniSIPServer. The default value is "myvoipapp_minisipserver". Of course, we can change the database name and remember to re-start miniSIPServer to enable it. You don't need create this databse in MySQL manually, miniSIPServer will create it automatically when it starts up if all MySQL configuration are right. |
| User name | String | The user name created in MySQL database. The user should have enough right to create database, create/modify/query tables, etc. |
| Password | String | Password of the visit user. It depends on MySQL configuration. |
6.4 SMTP
SMTP configuration is used to connect SMTP server and send e-mail. For example, in "voice mail" feature, miniSIPServer will use this configuration to send voice mail to users' email box.
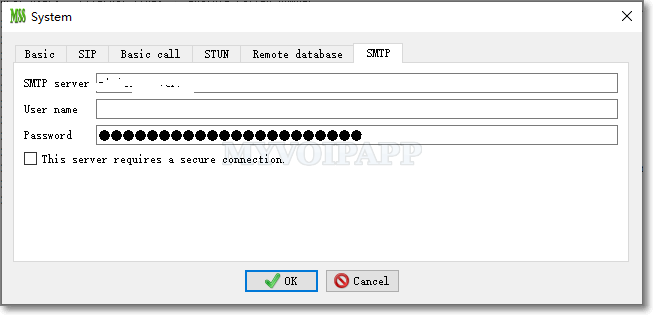
| Item | Type or value | Description |
|---|---|---|
| SMTP server | String | SMTP server , such as "smtp.gmail.com". |
| User name | String | The user name which will be used to login into SMTP server. If the SMTP server doesn't need authorization, this item can be blank. |
| Password | String | The password of SMTP user. It is also used to login into SMTP server. If the SMTP server doesn't need authorization, this item can also be blank. |
| This server requires a secure connection | Yes or no | If the SMTP server requires SSL/TLS connection, this option must be selected. |
6.5 Call detail record
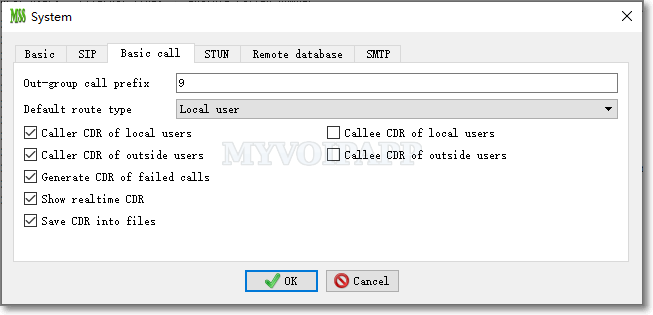
| Item | Type or value | Description |
|---|---|---|
| Local users caller CDR | Yes or no | If it is selected, it means miniSIPServer will generate original CDR for local users when the call is disconnected. |
| Local users callee CDR | Yes or no | If it is selected, it means miniSIPServer will generate terminal CDR for local users when the call is disconnected. |
| Outside users caller CDR | Yes or no | Whether generate original CDR if the call is from outside miniSIPServer through external lines or trunks. |
| Outside users callee CDR | Yes or no | Whether generate terminal CDR if the call is routed to outside miniSIPServer through external lines or trunks. |
| Generate failed call CDR | Yes or no | Whether generate a CDR even the called user doesn't answer the incoming call. |
| Show real-time CDR information | Yes or no | Whether show CDR information in real-time window. If it is selected, please click menu "Window - Real time CDR" to get real-time CDR information. |
| Output CDR into files | Yes or no | If it is selected, miniSIPServer will store CDR records into local files which can be found in "//AppData_DIR/cdr/" directory. By the way, one day, one CDR file. |
6.6 STUN
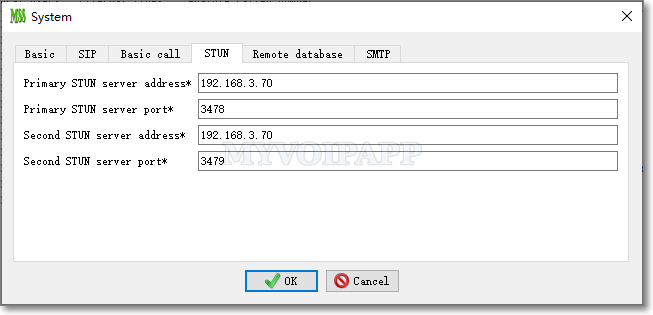
| Item | Type or value | Description |
|---|---|---|
| Primary STUN server IP address (MIP) | String | The primary STUN server IP address which miniSIPServer will bind. |
| Primary STUN server port (MPORT) | Integer | The primary STUN server port which miniSIPServer will bind. The default value is 3478 which is defined in STUN standard. |
| Second STUN server IP address (SIP) | String | The second STUN server IP address which miniSIPServer will bind. |
| Second STUN server Port (SPORT) | Integer | The second STUN server port which miniSIPServer will bind. It MUST be different with MPORT. |
In normal, the computer where STUN server is running shall have two network adapters. If only one network adapter is installed, some NAT types cannot be detected rightly.
miniSIPServer should be restarted if one of these items have been modified.
miniSIPServer will open following sockets to process STUN requests.
- MIP : MPORT
- MIP : SPORT
- SIP : MPORT
- SIP : SPORT
Please click menu "data / SIP trunk" to configure SIP trunk.
7.1 Basic
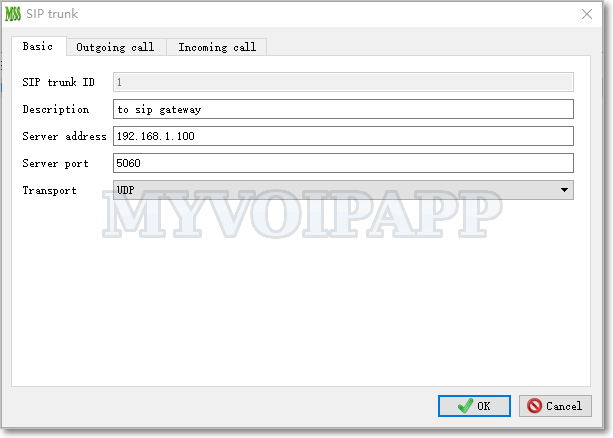
| Item | Type or value | Description |
|---|---|---|
| SIP trunk ID | Integer | ID of current record. |
| Description | String | Description. It can be blank. |
| Server address | String | Peer SIP server address. It cannot be blank. It can be an IP address or host name. |
| Server port | Integer | Peer SIP server IP port. It cannot be blank. |
| Transport | UDP or TCP | SIP transport to send SIP messages, it can be SIP over UDP or SIP over TCP. By default, most SIP devices use SIP over UDP. |
7.2 Outgoing call

| Item | Type or value | Description |
|---|---|---|
| Unified caller number | String | It can be blank. If it is not blank, miniSIPServer will use it as caller party number in the outgoing calls. |
| Additional parameter of Request-URI | String | It can be blank. If it is not blank, miniSIPServer will add it to the Request-URI of all outgoing calls. |
| Time condition ID | Integer(>=0) | Set its working time. Please refer to “Time condition” document. |
| Outgoing group ID | Integer(>=0) | Several external lines or SIP trunks can have same outgoing group ID. In "dial plan" process, this group ID will be used to change numbers or select routing.
Default "0" means there isn't group and "dial plan" process will not refine its numbers of outgoing calls. |
| Maximum concurrent outgoing calls | Integer(>=0) | The maximum concurrent outgoing calls of the SIP trunk. Too much outgoing calls will be rejected.
If it is zero, that means no outgoing call. The SIP trunk will only be able to receive calls, cannot make calls out. |
| Try next SIP trunk when fail | Integer(>=0) | Next SIP trunk ID which will be called to if current call is failed.
If it is zero, the call will not try another SIP trunk and be released directly if it is failed. |
| Relay media stream | Yes or no | By default, SIP trunk will not relay media stream in outgoing calls. If this item is selected, SIP trunk will relay media streams for its outgoing calls. At this time, only audio streams will be processed. |
7.3 Incoming call
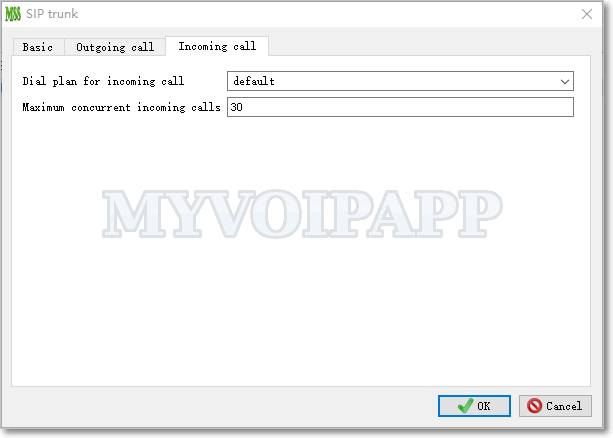
| Item | Type or value | Description |
|---|---|---|
| Dial plan for incoming call | String | dial plan name for incoming call. By default, its value is 'default'. We can change it to another dial plan as we want, and it will effect final 'dial plan' process and routing selection. |
| Maximum concurrent incoming calls | >=0 | The maximum concurrent incoming calls of the SIP trunk. Too much incoming calls will be rejected. If it is zero, that means no incoming call. The SIP trunk will only be able to make calls out, cannot receive any calls from outsides. |
miniSIPServer can support powerful dialing plan and flexible routing. In this section, following subjects will be described.
- Transition
- Refine caller number
- Refine called number
- Analyze caller number
- Analyze called number
Please refer to "Dial plan" document for more details about some important concepts of "dial plan" feature. Here, we only describe the details of its configurations.
8.1 Transition
"Transition" is used to change numbers, such as caller number, called number, and so on.
Please click menu "Dial plan / Transition" to show "Transitions" main window.
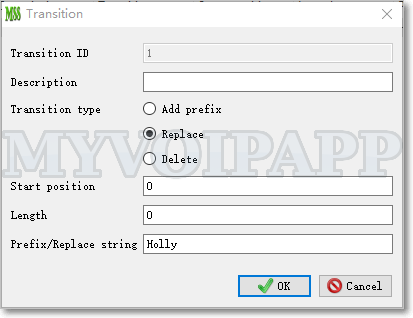
| Item | Type or value | Description |
|---|---|---|
| Transition ID | Integer | Transition ID. It will be referred by other records. |
| Transition type | 1: Add prefix | Add a prefix before current called or caller string. "Prefix / Replace string" item must be configured together. |
| 2: Replace | Replace target string with a specific string which should be configured in "Prefix / Replace string" item. The target string is confirmed by "start position" and "length" items. |
|
| 3: Delete | Delete a string which should be confirmed by "start position" and "length" items | |
| Start position | Integer | The start position from where current transition will be done. Valid value is between 0 and 31. 0 means the first digit of the number. |
| Length | Integer | The target transition length. It indicates how many characters should be deleted or replaced. Valid value is between 1 and 31 |
| Prefix / Replace string | String | The specific strings which will be added as a prefix or replace target strings. |
Since 'transition' is a very important and useful element in dial-plan and analysis process, we give some examples to describe how to use it.
Example 1: Change "1234" to "Holly1234".
    Transition type = Add
    Prefix/Replace string = Holly
Example 2:Change "1234" to "34".
    Transition type = Delete
    Start position = 0
    Length = 2
Example 3: Change "1234" to "Holly34".
    Transition type = Replace
    Start position = 0
    Length = 2
    Prefix/Replace string = Holly
8.2 Refine caller number
Please click menu "Dial plan / Refine caller number" to show its main window.

| Item | Type or value | Description |
|---|---|---|
| Group ID | Integer | A group of 'refine caller number' records. This ID will be referred by other records. |
| Caller number prefix | String | miniSIPServer use longest-match method to match caller numbers with this prefix. For example, there are two recrods whose 'caller number prefix' is '123' and '12', if the caller number to be analyzed is '1234', the record '123' will match it. |
| Transition ID | Integer | If current record matchs the caller number, this transtion id will be used to get transition type and change the caller number. |
8.3 Refine called number
In "dial plan", if calls are routed to external lines or SIP trunks, we can use this function to refine their final called number in outgoing calls.
Please click menu "Dial plan / Refine called number" to show its main window.
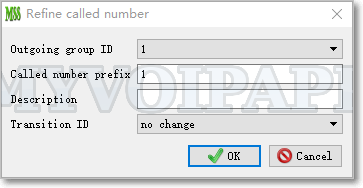
| Item | Type or value | Description |
|---|---|---|
| Outgoing group ID | Integer | This item is defined in external line or SIP trunk outgoing call configuration. This function will use it as index item to refine called numbers of their outgoing calls. |
| Called number prefix | String | miniSIPServer "dial plan" process will use this item with "outgoing group ID" item to match calls. If calls are matched, "dial plan" will refine their called numbers. |
| Transition ID | Integer | If current record matchs the call, this transtion id will be used to get transition type and change called number of current call. |
8.4 Analyze caller number
Please click menu "Dial plan / Analyze caller number" to show its main window.
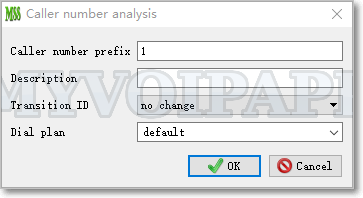
| Item | Type or value | Description |
|---|---|---|
| Caller number prefix | String | Caller number prefixes string. miniSIPServer use longest-match method to match caller numbers with this prefix. |
| Transition ID | Integer | Transition id for current caller number prefix. The analysis will change caller number according to the transition configuration. |
| Dial plan | String | Dial plan name. The default value of dial plan is "default". We can indicate any other dial plan name for specific caller number ( or caller number prefix). In the next "analyze called number" configuration, the "dial plan" will be the key parameter. |
8.5 Analyze called number
"Called number analysis" is core procedure in miniSIPServer dialling plan and analysis process. Its analysis result will change caller number or called number and get final routing for calls.
Click menu "Dial plan / Analyze called number" to show its main window.
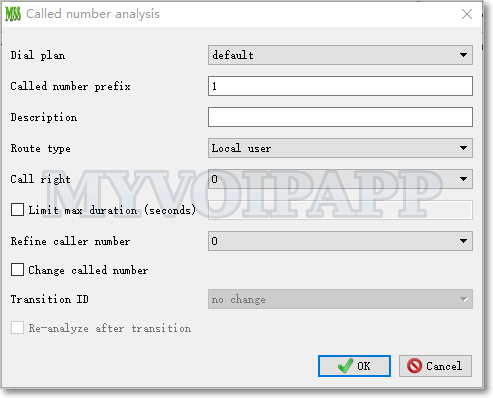
| Item | Type or value | Description |
|---|---|---|
| Dial plan | String | Dial plan name.
Both "Dial plan" and "Called number prefix" are key parameter for this analysis process. With different "Dial plan", "called number prefix" can be same. With different "called number prefix", "dial plan" can be same. In "Analyze caller number", we can indicate different "dial plan" for different caller numbers, then we can configure different result with the same called prefix for different callers. |
| Called number prefix | String | The target called number prefix to be analyzed. miniSIPServer use longest-match method to match called numbers with this prefix. |
| Route Type | Local user (extension) | The call should be routed to local users. |
| External line | The call will be routed to outside through an external line. If a specific external line is configured, the call will be routed through this specific external line. |
|
| SIP trunk | The call will be routed to a specific SIP server which is indicated by "SIP trunk ID" . If it is selected, "SIP trunk ID" must be set together and it can be found and configured according to "SIP trunk". |
|
| Routing group | The call will be routed to a routing-group.
If it is selected, "Routing group ID" must be set together. Please refer to "routing-group service document" for more details. |
|
| Intercept | Current call should be intercepted and released immediately. | |
| Change called number | Yes or No | It indicates whether the called number should be changed. If it is selected, two important items must be configured at the same time. one is "Transition ID" used to change called number. Another is "Re-analyze after transition". If it is selected, it means analysis process should be done again after the called number is changed. |
| Refine caller number | Integer | whether caller number should be refined after this procedure. If it is zero, it is unnecessary to refine caller number. If it is not zero, miniSIPServer will try to refine caller number according to 'refine caller number' group configuration. |
| Call right | Integer | Call right for current record. If it is 0, that means no limitation, all local users can make calls with this prefix. If it is non-zero, that means only local users who have the call right can make calls with such prefix. |
| Limit max duration (seconds) | Integer(>=0) | The max duration of matched call. If timer expired, miniSIPServer will force to release the call automatically. '0' means no limitation. |
We can see that miniSIPServer can route calls to different destinations according to different called prefix, dial plan, etc. It is very flexible for our VOIP deployments.
Please refer to services guide documents for more details. Here we only describe some configurations which can be shared or used by several services.
9.1 Lua services trigger
In miniSIPServer, there are several methods to implement service logic. Some services are fixed in miniSIPServer, such as hunting-group. Some services are written in IVR-XML, such as auto-attendant. Some services are written in Lua script, such as calling-card, DISA, etc. For advance users, Lua script is very flexiable and powerful. In fact, miniSIPServer core has provided a set of interface for Lua script.
Both our R&D team and our advance customers can use Lua script to implement complex or customerized services. We don't provide more details about Lua script, and only describe how to trigger a Lua service according to called number prefix of a call.
Please click menu "services / Lua services"
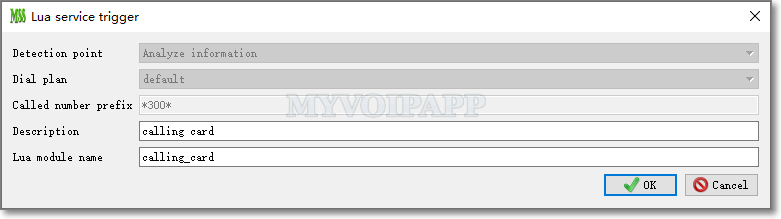
| Item | Type or value | Description |
|---|---|---|
| Dial plan | String | The "dial plan" name for incoming calls. Different local users or SIP trunks can have different "dial plan" name. If they are not indicated, the default value is always "default". |
| Called number prefix | String | This prefix is used to match the called number of incoming calls. It follows the "maximum length matched" rule of dial plan feature. miniSIPServer will trigger different Lua service according to different "dial plan" and "called number prefix" of incoming calls, and you can use different called number prefix to trigger the same Lua service. |
| Description | String | Description of current record. |
| Lua module name | String | Base file name of Lua service. Please pay attention that it is just base file name and doesn't include directory path. System Lua files are stored in the sub-directory "lua/services" which can be found in the miniSIPServer install directory.
Customerized Lua file should be saved in the "lua" sub-drectory of application data directory. |
All audio files have been installed with miniSIPServer and stored in the sub-directory "mss_ann". For example, if miniSIPServer is installed in directory "d:/myvoipapp/minisipserver", the audio files will be installed in directory "d:/myvoipapp/minisipserver/mss_ann".
Below table lists all audio files and their contents. In your deployment, you can replace them with your own audio files. If you use your own audio files, they MUST be saved in 'custAnn' sub-directory which is in application data directory. Please refer to document "How to record my own audio?" for more details.
In miniSIPServer, audio file name must be "xxx.wav" format. "xxx" must be 8 characters and only 0-9 and a-f are valid. In fact, "xxx" is the exact audio ID in miniSIPServer.
WAV file MUST be 'CCITT A-law, 8KHZ, 8Bit, 7kb/sec' format.
| Audio ID | Service | Content |
|---|---|---|
|
00080002 |
Common |
Music |
|
00080003 |
ringing-back tone |
|
|
00080030 |
zero |
|
|
00080031 |
one |
|
|
00080032 |
two |
|
|
00080033 |
three |
|
|
00080034 |
four |
|
|
00080035 |
five |
|
|
00080036 |
six |
|
|
00080037 |
seven |
|
|
00080038 |
eight |
|
|
00080039 |
nine |
|
|
0008003a |
ten |
|
|
0008003b |
eleven |
|
|
0008003c |
twelve |
|
|
0008003d |
thirteen |
|
|
0008003e |
fourteen |
|
|
0008003f |
fifteen |
|
|
00080040 |
sixteen |
|
|
00080041 |
seventten |
|
|
00080042 |
eighteen |
|
|
00080043 |
nineteen |
|
|
00080044 |
twenty |
|
|
00080045 |
thirty |
|
|
00080046 |
forty |
|
|
00080047 |
fifty |
|
|
00080048 |
sixty |
|
|
00080049 |
seventy |
|
|
0008004a |
eighty |
|
|
0008004b |
ninety |
|
|
0008004c |
hundry |
|
|
0008004d |
thousand |
|
|
0008004e |
million |
|
|
0008004f |
billion |
|
|
00080050 |
second |
|
|
00080051 |
minute |
|
|
00080052 |
euro |
|
|
00080053 |
cent |
|
|
00080054 |
and |
|
|
01080000 |
A beep tone |
|
|
01080001 |
Your operation is success. |
|
|
02080003 |
Voice mail |
Press 0 to delete current message. Press 1 or wait for several seconds to go to next message. |
|
02080004 |
Please leave your message |
|
|
02080005 |
You have no message. |
|
|
07080001 |
Caller prepaid |
Sorry, your balance is insufficient. Please make a payment. |
|
08080001 |
Hunting group |
All operators are busy now, please wait a moment. Your waiting number is |
|
0a080001 |
Auto attendant |
Welcome, please input extension number |
|
84080001 |
Calling card |
Please input your calling card number |
|
84080002 |
Please input password |
|
|
84080003 |
Please enter your destination number, followed by the pound key. |
|
|
84080004 |
Your duration is |
|
|
84080005 |
Your balance is |
|
|
84080006 |
Destination unavailable. |
|
|
84080007 |
Invalid card. |
|
|
84080008 |
Bye bye. |
|
|
84080009 |
Please press 1 to dial new destination, press 2 to dial the same destination, or press 3 to use a new card. |
|
|
85080001 |
DISA |
Please input your DISA account |
|
85080002 |
Please input password |
|
|
85080003 |
Please input destination number |
|
|
86080001 |
Call forwarding |
Current call is to be forwarded, wait please. |
Sometimes, some scenaios require miniSIPServer to do some special process which could be different with common requirements. In order to fit these requirements and don't effect common process, miniSIPServer use special variant parameters to control these special modifications or call flows, and these parameters are all stored in 'mss_var_param.ini' file.
By default, 'mss_var_param.ini' file is not included in miniSIPServer install package, so you cannot find it after you install miniSIPServer. If necessary, you need to create it manually and save it in the "config" sub-directory of miniSIPServer application directory. When miniSIPServer starts up, it will prompt where its application data directory is. Please refer to below figure.
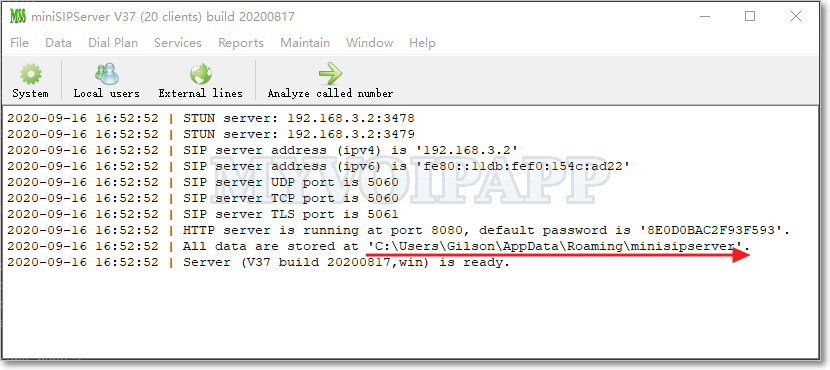
For example, the application data path is 'C:\Users\Gilson\AppData\Roaming\minisipserver' on windows system, then the full path of 'mss_var_param.ini' file should be 'C:\Users\Gilson\AppData\Roaming\minisipserver\config\mss_var_param.ini'. On Linux systems, including Pi, if the application data path is '/home/pi/.minisipserver', then the full path of 'mss_var_param.ini' file should be '/home/pi/.minisipserver/config/mss_var_param.ini'.
'mss_var_param.ini' is a .INI format text file, you can use notepad or any other text editors to create, modify and save it. This file has .INI format as below:
                [session name]

                parameter name=paremeter value
For an instance, below is a demo parameter 'gVarGuiLang' whose session name is 'gui', parameter name is 'gVarGuiLang' and parameter value is '1'.
                [gui]

                gVarGuiLang=1
There are several session definitions which are used by different inner modules. Please refer to following details.
| Session name | Description |
|---|---|
| ccf | Call-control module uses this session to change some special call flows, for example, to disable music-on-hold feature. |
| gui | Special requirements for GUI. |
| scp | Service-control-process modules use this session to change some features of special services, for example, to control service mode of voice-mail service. |
| sip | SIP modules use this session to change SIP flow or some default values in SIP stacks. |
| srf | Special-resource-function module uses this session to control special media process, for example, to change default language of audio file. |
| sys | Parameters are required to modify whole miniSIPServer system process. |
This document will not discuss more details about paramters and their values because they could make wrong effect to whole system if you don't understand them very clearly, so please be careful. If you have special requirements, please discuss and confirm with our support team.